Seat belts? The law and also common sense. They also keep you and your passengers from falling out during those hard cornering maneuvers. A set was ordered from
Morris 4 x 4 in black for the front seats. These are quality 3 point retractable belts made by
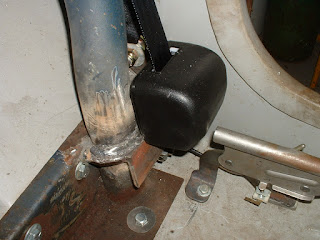
Seatbelt Solutions Mounting the retractor on the drivers side was critical due to the way we mounted the e-brake for which clearance was needed for proper operation. So we started on that side first then duplicated the passenger side to match. We started with a length
of 2" x 2" x 1/4" angle with a circular cut out for the roll bar, then welded a 1/4" thick plate to mount the other end of the belt. Two holes were drilled to accommodate 1/2" x 20 grade 8 bolts that were welded in place.Then the whole assembly was tack welded in place. The roll bar was then removed for a more thorough welding. After reinstalling the roll bar, a location for the 3rd. mounting point was established by sitting in the seat and finding a comfortable shoulder position height on the roll bar. Since this position is non adjustable as on newer cars, it was a once and done deal. Nothing more aggravating than having a shoulder belt cutting into your neck. We looked around for weld in seat belt bungs for roll
bars, but came up empty handed. The bar we are using came from a later CJ7 with no shoulder belt accommodations or windshield bar mounts. This bar measures 2 1/4" diameter. The longest bungs found only work with a maximum of 2" diameter roll bar. So we had to come up with our own solution. Ironically even if we would have found longer bungs, they could not have been inserted from the back of the bar because the angled down tube was in the way. We got some 3/4" round stock and cross drilled and tapped for 7/16 x 20 thread, then an additional piece of the same stock was drilled with a 29/64" thru hole. The end of that piece was milled with a 3/4" dia. end mill to mate to the first piece in a T

configuration. A 3/4" hole saw was used to cross drill a hole and another from the front to intersect it. The cross threaded piece was inserted from the side and the thru hole piece inserted from the front till it contacted the cross piece. Lengths were marked leaving 1/4" protruding from the roll bar for welding. Cut to length, everything was reinstalled and a 7/16 x 20 grade 8 bolt was put thru the belt flange, a bushing, the thru hole piece and then threaded into the cross piece. It is only mocked up right now but will be put back together later without the belt and welded. This should easily be as strong as the bung method. The center belt pieces are yet to be installed till we get buckle sleeves that keep the buckle end
rigid and upright.


