Thursday, May 25, 2006

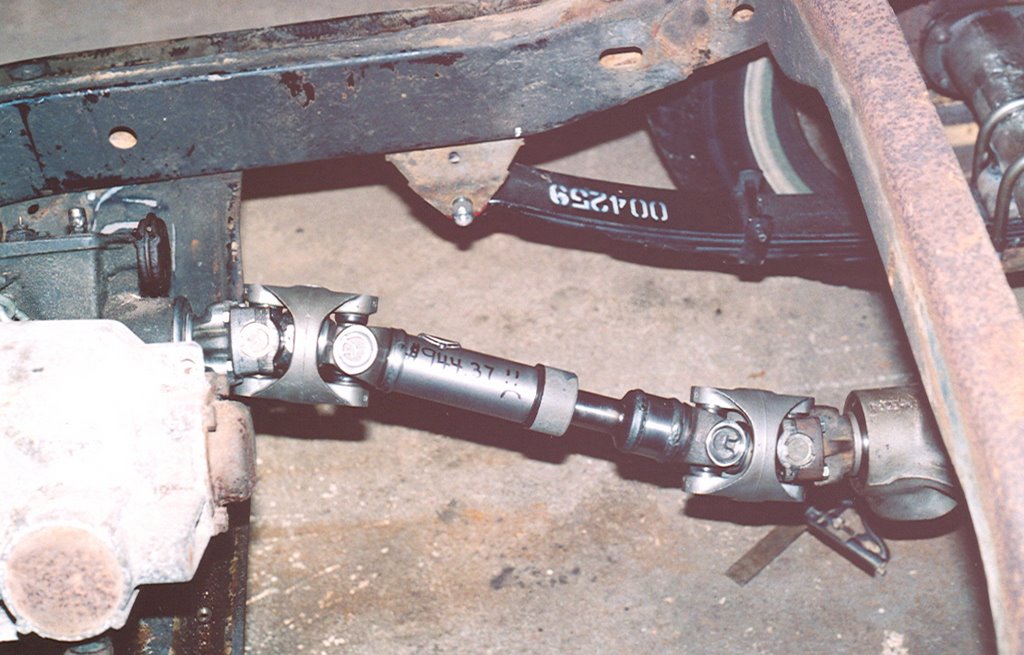
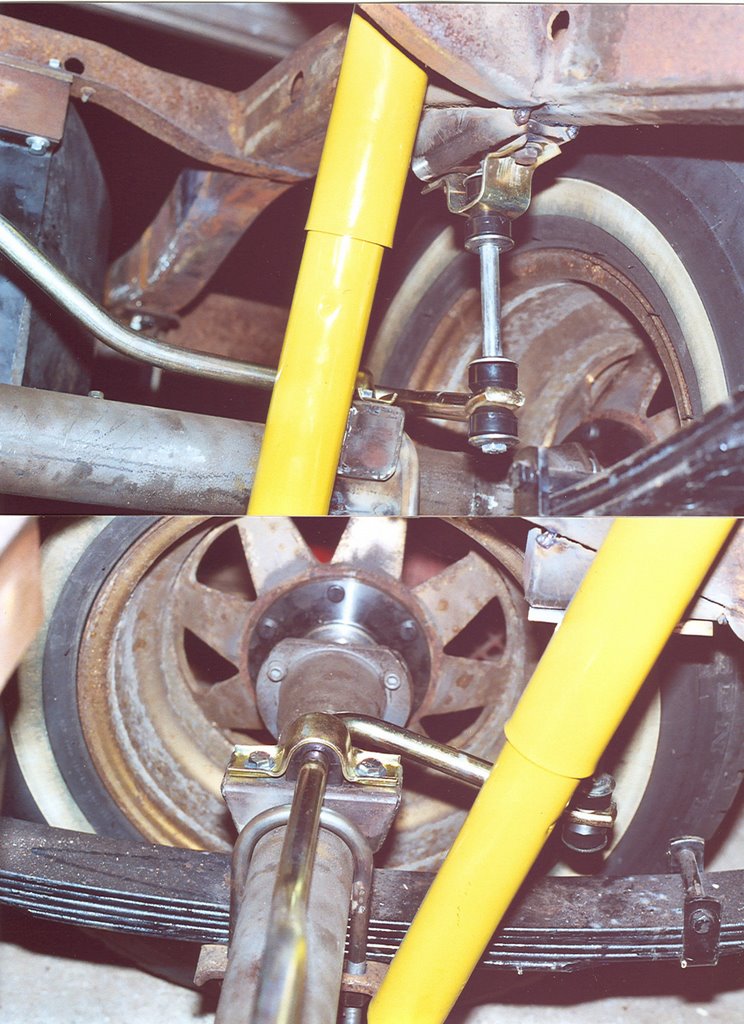
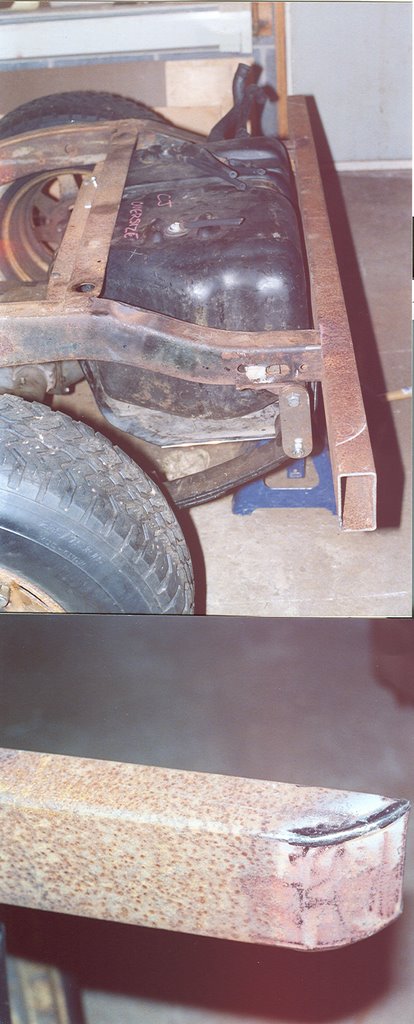
We picked up this 20 gal. poly. gas tank at the Blue Mountain Jeep Alliance http://www.bmja.org/ yearly flea market in Orwigsburg for $20.00 and a skid plate from I guess a Wrangler at EZ Pull & Save in New Ringgold. (Phone 570-386-2171). All we had to do was lower the skid plate and change it from two hold down straps to one. A length of steel was added to the second crossmember to achieve this. Also sliced a little off the right side to clear the leaf springs. A new rear crossmember was fabricated from 2 x 4 box tubing. Just cut holes in for the frame rails and slid it on. Take notice we had to reverse the shackle mounts to clear the new crossmember because it is bigger than the frame. The centerline of the shackle pivot point was kept the same so as not to disturb the geometry. The old tub was set on to scribe a radius on the ends of the crossmember to match the body. This will give a bit more protection for the corner of the body and I never liked how the factory crossmember looked anyhow. We are also thinking about notching out the crossmember for the exhaust, this should look pretty trick. We'll just take a piece of pipe and slice it in half and notch out the crossmember and weld it in place, sort of muscle car era look.

Sunday, May 21, 2006


A little safety goes a long way in the shop, and we always try to practice that. Here is Jeff drilling out some reinforcement plates for the front shock mounts. The originals were shorter and welded to the frame, but since we switched to a wide trac axle we needed the longer shock towers as on the later Jeeps. I think the frame I took these off of had crush sleeves inside the frame rails, so we added these plates to eliminate any collapsing of the rails. Front shocks, again the good boys at B & S Auto Parts came thru with technical data so I could measure and come up with a standard shock. Also Monroe, part number 34821, cost $73.46. I took measurements off the donor frame but then moved them front to coincide with the shackle reversal moving the axle ahead. I also took a hole saw and drilled a drain hole at the bottom outside of the shock tower to eliminate any dirt and water being trapped between the shock mount and frame.


How about a little driveshaft technology? Since we put a 2" suspension lift on this thing and with the longer pinion nose of the Dana 44 the already short drive shaft exceeded the 10 deg. max angle per a single u-joint. Plus looking down at the driveshaft it did not line up with the differential by 1 1/2". So now we have a compound angle to deal with. Everything I have read states that if the pinion angle is parallel with the output shaft and it doesn't exceeds 10 deg. a single u-joint can be used at each end. What a lot of people do if the angle does exceed 10 degs. is they tilt the pinion up so that it is parallel with the driveshaft. That's ok if you run a double carden joint on one end and a single on the pinion end. You see it takes 2 u-joints at the same angle to cancel out any vibration, as they turn they do not run at a steady speed, they run fast & slow. Therefore a second joint on the same end is needed to cancel out any vibration. When the driveshaft is parallel to the axle it will not set up a vibration. In our case we could have gotten away with tilting the pinion up if the pinion would have been in a straight line to the driveshaft looking down on it, but it was 1 1/2" off center. (compound angle) So we needed a double carden on each end to cancel out 2 different alignment issues. Several shops told me it would only vibrate slightly at different times and that a double carden was not needed. Well this thing is going to be street driven, and if it can be built with no vibration, then it will be built with no vibration. I knew of Tom Woods http://www.4xshaft.com/index.html but figured a local shop would be cheaper. The same shop that shortened the axles also did driveshafts. So I told Hartman Driveshaft and Axle, of Reading Pa. what I wanted. At first he claimed that we didn't need a double carden on each end that the vibration would be minimal. I persisted, even gave him some carden yokes to reuse and gave me a verbal quote of $500 to $600. Till it was all said and done the total was $944.73. OUCH!!! Now don't get me wrong, this shop does super quality work, did a great job on the axles, and takes pride in their workmanship. The killer driveshaft will never brake and the quality is impeccable, I'm just saying, shop around. I could have had the same shaft built by Woods and delivered to my door with a warranty for $650.00. Oh well, at least the front drive shaft is stock and only will require a rebuild.

Thursday, May 18, 2006


Moving to the rear we added a sway bar from Addco Manufacturing http://www.addco.net/. They make sway bars for all sorts of vehicles. (Got one for my J10 years ago and they even made a special one for my CJ5). Part number OOK1-260-OU. 3/4" diameter and cost $134.00 for the CJ7. I was a little leary that the bend in the center of it was going to clear the offset differential. Turned out the way they wanted it installed, this was going to interfere with our exhaust plans. It was to be installed with the center bend going over the driveshaft, fastened to the bottom of the frame rails, with the legs pointing towards the back and the ends fastened to the top of the leaf springs. Our plans for a dual in/dual out transverse muffler hung from the crossmember above the axle wasn't going to cut it. So I turned it around with the legs facing forward and the centered bend going over the top of the axle the way I originally thought it was to be installed. Luckily there was enough clearance for the offset differential. Had to fabricate mounts welded to the top of the axle tubes, and then another set of wedge shaped mounts welded under the frame rails. I used their u-brackets, but ran into a problem with their links not long enough. Did some measuring and determined that a set I had for the front of my 1967 Olds 442 were the perfect length. These are made by TRW http://www.trw.com/home/main/0,,,FF.html part number 18053. The rear shocks were gotten thru B & S Auto Parts. They were kind enough to copy spec pages out of their Monroe gatalog, http://www.monroe.com/ took that and determined which ones we needed, they are part number 34802, cost $77.95.

Sunday, May 14, 2006


I told you earlier I would fill you in on a 401 that I stumbled on, so here it is. I called Jasper Motors http://jaspermotors.com/ about a 4.2 engine for my Eagle and just for the heck of it asked if they had any 401's. The guy laughed, said "the last core that came thru here was $1000.00." I told him about the CJ project, and he said "you should talk to my brother Ross Peterson, he's an AMC guru." Called him up and told him what we were into and he asked if we had the 401 built yet? No we aren't that far yet. Wanna buy one already built with 7000 miles on it? Turns out he built it himself for a Wagoneer he had, then ended up selling it minus the engine to a friend of his. It is built basically stock .030 over with premium parts and then balanced, has a rare R4B Edelbrock intake that was made for AMC to use in the SC/Ramblers. The torque curve is a little too high for the CJ, so we will be selling the intake. In the Wagoneer with a 400 Turbo and quadra trac, on a wet road moving at speed and dumped it into 2nd gear it would brake all 4 tires loose. By this time I'm figuring this thing is out of our price range, but had to ask how much? $3000.00!! Crap, I can't have one built for that. The bad part was he already sent adds out to AMC publications to sell it, but they didn't hit the news stands yet. So I had very little time to think it over. So needless to say I sent a down payment and picked it up 2 months later. He had a really nice run stand, so we could hear it run. You could actually put your hand on the valve cover and hardly feel it running that's how well balanced it is. Can't wait to get this thing installed.

Saturday, May 13, 2006


This post will get a bit technical so if part numbers and details bore you, you might want to move on. If you think you might like to duplicate a steering set-up like this then I can save you a lot of aggravation and money on Advil, read on because this turned out pretty sweet.
Do in part to switching to Dana 44's and keeping the Wagoneer spindles we ended up with only one tie rod end hole on the passenger side instead of two like the CJ. This proved to be troublesome in figuring out a tie rod set up. The Wagoneer tie rod has an intregrated tie rod end and would have to be shortened. We wanted to eliminate problems in the future when a tie rod end goes bad that another custom tie rod wouldn't have to be made plus the down time. Also with the shackle reversal moving the axle forward 1 1/2" brought the tie rod that much closer to the pitman arm. I see now why M.O.R.E.
http://www.mountainoffroad.com/ doesn't recommend a dropped pitman arm, it would obviously hit the tie rod. But we wanted to keep everything as parallel as possible to eliminate bump steer with the 2" lift and that meant a dropped arm. The dropped arm came from a 1987 Wrangler (square headlight) as did the beefier sway bar. The good old boys at B & S Auto Parts in Pine Grove loaned me an extra spicer parts book and after a few nights of reading and measuring I decided on a tie rod end incorporating a tapered hole for a drag link for a 1/2 ton Chevy. This gave me the same size ball end as a Wagoneer (bigger than a CJ) and the extra hole that was needed for the drag link that was eliminated off the spindle. (Spicer part number 401-1275. cost $18.29) The only problem is that this end is designed for the driver side of the Chevy thus the tapered hole, which was designed for a steering dampener was facing the wrong way, but happened to be smaller than the draglink tapered end. The hole had to be enlarged from the other end. So I did some searching for tapered reamers and found what I needed on Ebay. Damn isn't technology great? The reamer is an Xcut brand #5952, 1 1/2" taper per foot, bought from Ebay seller tltrades at his Ebay store XKUT for $47.99. I measured with a dial calipers what the large diameter of the hole should be and put a piece of tape on the reamer to get the depth, then mounted the tie rod end on a drill press and slowly reamed it out. The driverside tie rod end is a Spicer part number 401-1134, cost $34.89. The main tie rod is the only mildly custom part, but if you never damage it, will never need to be replaced. It is made from a 1979 Jeep J10. I have seen these in 2 versions totally straight or a bend to give extra clearance for the pitman arm, get the straight one. Cut off the end with the lefthand thread to a length of 32" and have the end rethreaded 7/8 - 18 left hand, this will be the only machine shop work performed, unless you have access to one. I am a machinist by trade so I was able to take it to work and wrote a program for a cnc lathe and thread it there. You will also have to put a bend in it, at a 13" centerline from the lefthand threaded end to clear the pitman arm. ( Of course do this after it's rethreaded or you wont be able to chuck it in a lathe.) The bend was perfomed with a hydraulic pipe bender from Harbor Freight http://harborfreight.com/ item number 32888-svga cost $74.99 and a little bit of heat. The tie rod end and tie rod are connected with Spicer adjuster sleeves part number 425-1002 cost $7.33 each. The drag link is a Spicer part number 405-1009 cost $46.00. The threaded end was shortened by 1" and rethreaded with a 7/8 - 18 righthand die purchased from MSC http://www1.mscdirect.com/cgi/nnsrhm part number 03938180 cost $32.62. A Spicer tie rod end, part number 401-1224 cost $49.88 and another adjuster sleeve rounds out the drag link. Connect this end to the Wrangler pitman arm. As you can see everything is pretty well parallel and as the suspension travels the pitman arm now clears the bend in the main tie rod. You can also install a shock dampener and brackets from a J10 with no clearance issues. The sway bar from the Wrangler can be mounted in the stock location on the frame, but the legs are straight unlike the curved down ones on a CJ requiring longer connecting links and is also wider. Well it just happens that unmodified links from a J10 are the correct length, but will have to be mounted on the inside of the swaybar instead of the outside. The tapered holes in the sway bar are facing the wrong way for this. You know that reamer that was purchased for the tie rod end? Yep, same size, just mount on a drill press and ream half way thru and the tapered bolt can then be used from the J10. This makes for one beefy set up with full adjustability, and readily available replacement parts that can be easily modified at home.